Getting Ready to Plant
Dahlias like rich soil with good drainage. Incorporating organic material such as compost, peat moss and composted manure along with a granular fertilizer such as 5-10-10 every spring will ensure that the soil has a good supply of available nutrients to meet the demands of your plants. If drainage is a problem, consider raising the level of your bed by the addition of more composted materials such as wood chips, leaves or bark.
Dahlias are sun lovers - the more sun they have, the happier they will be. At the very least they require a minimum of 6 hours direct sunlight per day. The plants tend to be bushy and send feeder roots out several feet so ideally they should be planted 30” apart. If you are planting in rows, they should be 3’ apart. The average Dahlia will reach 4’ and with flowers held high on stems up to 2’ long, you may want to consider having some strong stakes available before you plant.
How to Plant
Dahlia tubers can be started in one of two ways. They can go directly into the soil in early May or they can be started earlier indoors. At the St. Albert Botanic Park, we plant both ways although the plants started indoors do begin blooming slightly sooner than those planted directly outdoors.
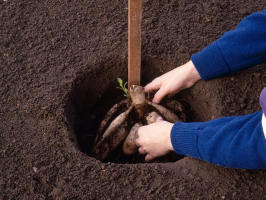
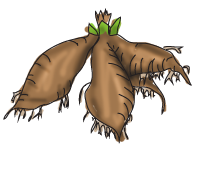
 To plant a single tuber (or multiple) in the ground is certainly the easiest route - the only serious consideration is ‘when’. As all Dahlias are extremely vulnerable to frost, you do not want to plant so early that shoots are above ground when there is still a chance of freezing. Our Dahlia tubers are planted in the soil during the first or second weekend in May. Any shoots remain safely below ground until danger of frost has past - this is usually around the 1st of June. Tubers should be planted 6” deep with the tuber resting horizontal on the soil with the growing shoot point up. Add 1/4 cup bonemeal to each planting hole.
A tall, strong stake should be placed firmly in the soil right behind the tuber. Placing the stake at planting time prevents damage to the tuber which frequently occurs if you ‘guess’ where to put the stake after the plant has been growing. If you plant many dahlias, you will have a lot of stakes...new gardeners fret about how they look but once the flowers come, you forget all about them. If the soil is moist, additional water is not necessary at planting time. If the soil is dry, water well so that moisture reaches the area around the tuber. Additional watering will not be necessary until shoots begin to appear.
If you decide to get a jump on things, tubers may be started in potting soil in large pots about 4 - 6 weeks before they can be set safely outdoors in the garden (approximately June 1). Keep only slightly moist until you see shoots coming up. At this point they can be fertilized and do not allow them to dry out. Keep in bright sunlight; move outdoors during the day if temperatures are mild. If they get tall and/or straggly, pinch to promote bushy growth. If you have a bit of a ‘green thumb’, these shoots that have been pinched off can be set in soil and will root and grow into an identical plant to its parent. These cuttings will also produce tubers which can be saved for the following season. When transplanting, place stakes in position and be very gentle with the root ball as tuber necks and new shoots can be fragile. Water well.
Summer Care
Once they are growing, Dahlias need 1” of water per week. Slow watering by a soaker hose encourages feeder roots to travel further in the search for water. This gives more stability to the plant as their roots take hold in the ground. Once plants begin to bloom, increasing water to 2” per week encourages larger flowers. Water earlier in the day so leaves will be dry by evening when the combination of moisture and cooler conditions invite fungus problems to develop. To improve bloom quality, do not water with sprinklers or other overhead devices once plants begin their blooming period.
Dahlias are heavy feeders and need frequent food. Fertilize every two weeks until one month before frost is expected. Avoid fertilizers too high in nitrogen which could encourage luxurious foliage at the expense of the blooms. A combination of 10-30-20 is a good formulation for blooming dahlias. Avoid using excessive amounts or uneven applications of fertilizer as it seems to cause distorted growth in the blossoms.
Dahlias are not bothered too much by pests or disease. On occasion a plant will show marked foliage and poor health due to a virus. If this does not disappear as the plant matures, it is best to dig out the tuber and throw it away. Once in awhile you will have an ‘aphid’ year so be on the lookout for them. They are usually black and come in groups making them easy to spot. Just knock them off with water or an organic soap spray. If there has been considerable rain, slugs can become a nuisance. Keeping the soil area around your plants clean will discourage slugs. There are a number of chemical and organic methods available that can be used to control slugs.
Dividing and Winter Storage
When should one start digging? The longer the tubers are in the ground curing, the more fully developed the tubers are and the better the likelihood of their successful storage over the winter. Most areas have a light frost that ruins partially opened blooms and top foliage followed by a hard freeze that may not arrive for a few weeks. Dahlias continue to grow and the roots continue to mature after light frosts. They may also continue to grow below ground after the first killing frost (depending on how deep the freeze affects the soil).
Once you decide when to dig, cut your stalk leaving about 6” which makes it easier to handle the delicate tuber. Carefully dig your tuber out, turn it upside down so moisture drains out of the stalk. (At this point, tubers can be washed with a garden hose if you wish.) Allow them to dry for several days after which you can easily remove the excess soil. Wash tubers with a garden hose and allow to dry. At this point you can either decide to divide the tuber or wait until spring. If you divide in the fall, the tubers are easier to cut but without a lot of experience it is not always easy to know where to cut. If you wait until spring, it is easy to see the eyes or new shoots, but the tuber can be very difficult to cut apart. The Dahlia team of volunteers at the Park keep tubers intact over winter and divide them in the spring.
In dividing clumps of tubers, each division must have a piece of the crown with an eye. This can be an overwhelming task as clumps can be huge in the fall with tubers growing from every direction. The eyes will be very near the stalk and even with experience, some gardeners are hesitant to divide. There is no reason you have to cut each single tuber away from the o ld stalk. Keep 2-3 tubers together with a bit of stalk and you will definitely end up with an eye (or two). While working with your tubers, check for signs of rot or disease and cut these areas out. Allow tubers to dry for another 1-2 days. If you have concerns about disease, dust tubers with a powdered fungicide or garden sulphur.
There are about as many ways to store tubers over winter as there are gardeners. Our volunteers nestle tubers in dry wood shavings in cardboard boxes in a cold room that is part of our garage. They check on them periodically as rotting can occur. If you choose to divide in the fall, your tubers will be of a size that are easy to store in clear sealed plastic bags with an amount of coarse vermiculite equal to the mass of the tubers in the bag. Do not overfill the bags - smaller tubers of one variety can all go in one bag while a larger division may be all you can manage in one bag. Bags can be stacked on shelves in a in a cool, dark place. The clear bags make the tubers easy to check (about every two weeks) to see if mold is developing or tubers are becoming soft. In spring move the bags into a warmer area to encourage eyes to develop and prepare for sprouting.